
In this article, I will share with you how you can make an electronic musical instrument using Arduino.
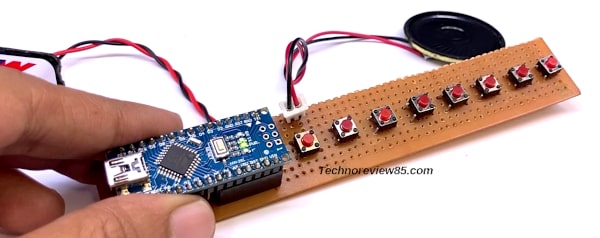
It’s a Mini piano project using Arduino Nano but if you want you can use an Arduino UNO board for testing. It’s a very easy Arduino project. I hope you can enjoy it after making it. The Arduino code for this project is included in this post.
About Arduino Piano
It’s a single octave piano on C major scale; it has 8 keys to play 8 different notes. The first key is C4 (Middle C) and the last key is C5.
You can play some basic songs using it.
It doesn’t have any sharp or flat notes.
You need to make
- Small speaker
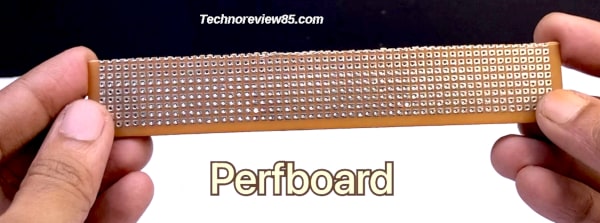
- Perfboard
- Female header pins
- Arduino Nano
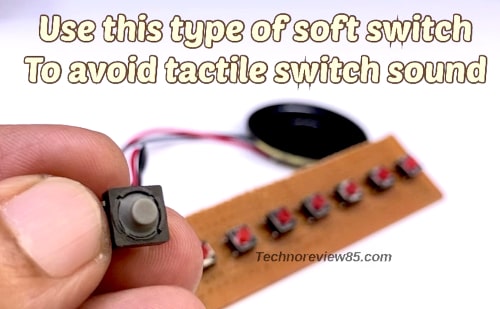
- Tactile switch 8 pcs
- 9v battery or you can use a power bank
- Some wires
- A led & 220-ohm resistor ( it is optional )
Connection
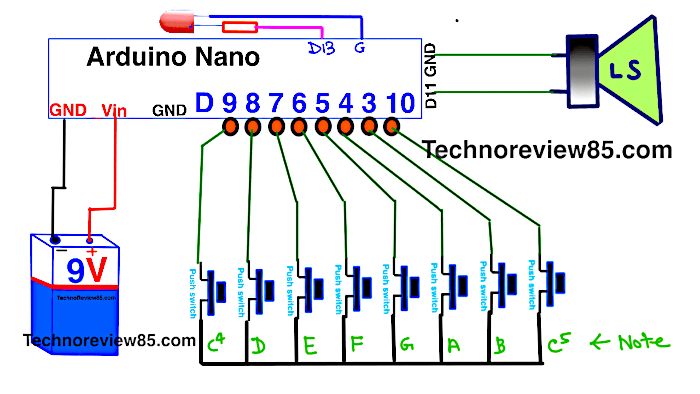
Connect 9v battery to Arduino Nano VIN pin & GND.
Speaker connected to Arduino D11 & GND.
Led connected to Arduino pin 13 via a 220E resistor.
Connect –
Note C4 to D9, D to D8, E to D7, F to D6, G to D5, A to D4, B to D3 & C5 to D10.
Follow the circuit diagram for more details.
Circuit Diagram
Project making video
Arduino code for piano project
//Arduino Piano by technoreview85.com
//C4 to C5

#define T_C 262
#define T_D 294
#define T_E 330
#define T_F 349
#define T_G 392
#define T_A 440
#define T_B 493
#define T_C5 523

const int C5 = 10;
const int C = 9;
const int D = 8;
const int E = 7;
const int F = 6;
const int G = 5;
const int A = 4;
const int B = 3;

const int Buzz = 11;
const int LED = 13;

void setup()
{
  pinMode(LED, OUTPUT);
  pinMode(C5, INPUT);
  digitalWrite(C5,HIGH);

  pinMode(LED, OUTPUT);
  pinMode(C, INPUT);
  digitalWrite(C,HIGH);

  pinMode(D, INPUT);
  digitalWrite(D,HIGH);

  pinMode(E, INPUT);
  digitalWrite(E,HIGH);

  pinMode(F, INPUT);
  digitalWrite(F,HIGH);

  pinMode(G, INPUT);
  digitalWrite(G,HIGH);

  pinMode(A, INPUT);
  digitalWrite(A,HIGH);

  pinMode(B, INPUT);
  digitalWrite(B,HIGH);

   digitalWrite(LED,LOW);
}

void loop()
{ while(digitalRead(C5) == LOW)
  {
    tone(Buzz,T_C5);
    digitalWrite(LED,HIGH);
  }

  while(digitalRead(C) == LOW)
  {
    tone(Buzz,T_C);
    digitalWrite(LED,HIGH);
  }

  while(digitalRead(D) == LOW)
  {
    tone(Buzz,T_D);
    digitalWrite(LED,HIGH);
  }

  while(digitalRead(E) == LOW)
  {
    tone(Buzz,T_E);
    digitalWrite(LED,HIGH);
  }

  while(digitalRead(F) == LOW)
  {
    tone(Buzz,T_F);
    digitalWrite(LED,HIGH);
  }

  while(digitalRead(G) == LOW)
  {
    tone(Buzz,T_G);
    digitalWrite(LED,HIGH);
  }

  while(digitalRead(A) == LOW)
  {
    tone(Buzz,T_A);
    digitalWrite(LED,HIGH);
  }

  while(digitalRead(B) == LOW)
  {
    tone(Buzz,T_B);
    digitalWrite(LED,HIGH);
  }

  noTone(Buzz);
  digitalWrite(LED,LOW);

}
Copy the above code and paste it to Arduino IDE software then upload the code to Arduino nano.
I’d like to find out more? I’d want to find out some additional information.