
Arduino pro mini which is smaller than Arduino nano board. we use it for more space-saving, small & lightweight project. Arduino pro mini has not any onboard programmer chip so we use FTDI programmer to program it.
Today I am going to describe in this article, If in case you have not FTDI programmer then you can program the pro mini using Arduino UNO board.
Here are two methods by removing the Arduino Uno board’s microcontroller & without removing microcontroller.
Programming by remove microcontroller of Arduino Uno
You need :
- Arduino Uno
- Breadboard
- Header pins
- Jumper wires ( male to male)
- Arduino pro mini 3.3 volt or 5 volt ( I am using 3.3v board for demonstration )
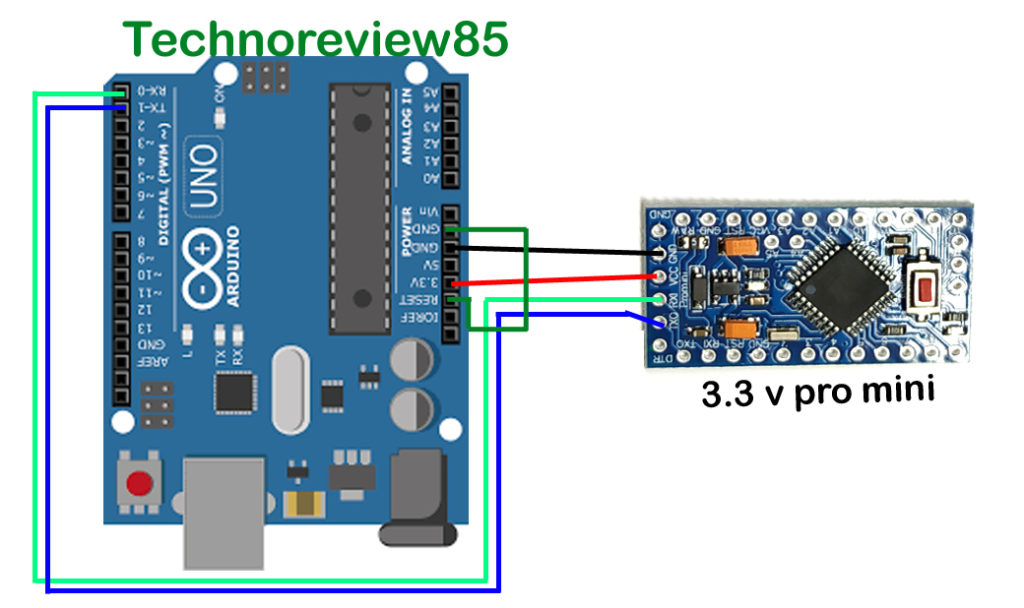
Remove the microcontroller Ic from Arduino Uno.
Connect Arduino pro mini to Arduino Uno as described below.
- Connect Arduino pro mini GND to Arduino Uno GND
- Pro mini Vcc to Arduino Uno 3.3v ( If you are using an Arduino pro mini 5 volt module then connect vcc to uno 5volt)
- Pro mini RX to uno RX
- Pro mini TX to uno TX
- Pro mini DTR pin to Arduino Uno Reset pin
Now connect the Arduino Uno to pc & open Arduino IDE software
Go to – tools – Board – select board Arduino pro mini
Now go to Tools – chose processor ( in my case it is Atmega 328p 3.3v 8mhz. You have to choose which is you are using )
Now go to tools – port & select your com port where Arduino Uno is connected.
Now upload the code.
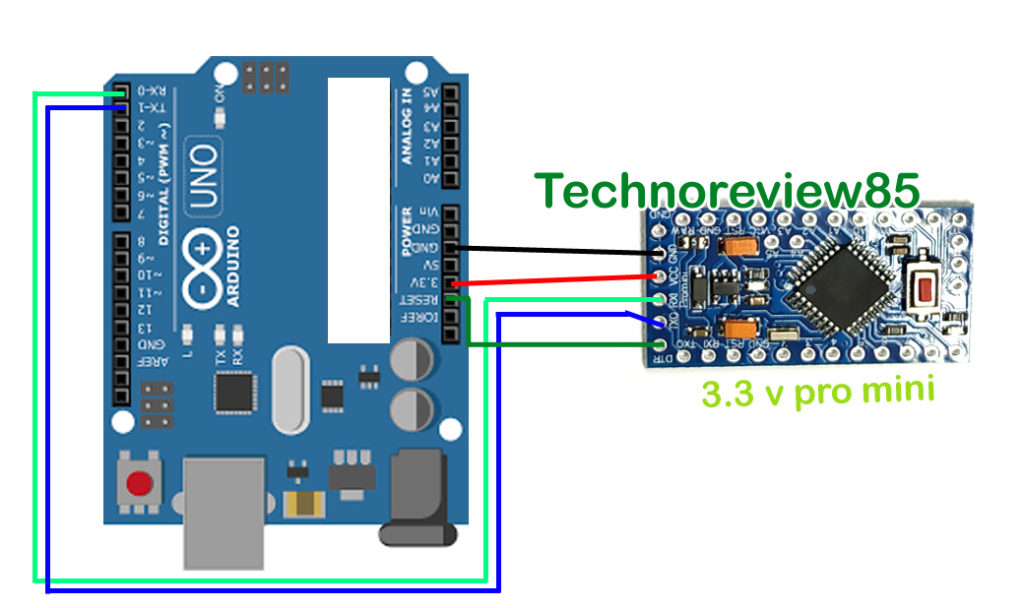
Second method without removing the microcontroller from Arduino Uno
Connection :
All connections are the same as the previous method just connect Arduino reset pin to GND & remove the wire from the DTR pin of pro mini
- Connect Arduino pro mini GND to Arduino Uno GND
- Pro mini Vcc to Arduino Uno 3.3v ( If you are using an Arduino pro mini 5-volt module then connect vcc to uno 5volt)
- Pro mini RX to Uno RX
- Pro mini TX to Uno TX
- Pro mini DTR no connection
- Arduino Uno Reset pin to GND
All software setup will be the same as the previous method
Here is the main thing which we have to do for this second method
when code is uploading just press the reset button of Arduino pro mini.
If you are uploading code to a new Arduino pro mini then I will suggest you, chose the first method because the second method may not works sometimes for the wrong timing of the reset button press.
Great info. Lucky me I found your site by chance (stumbleupon).
I’ve saved it for later!
Thanks for finally talking about > How to program Arduino pro mini using Arduino Uno (no need
FTDI programmer) < Loved it!
Dear friend, it is a great work. I did how you introduced and it worked well… Thank you
HeIllo, I am trying to do it on a Leonardo, so there is no first option for me… what would the right timing for pressing the reset button? I had no luck so far…
Very quickly this website will be famous amid
all blog people, due to it’s pleasant content
Finally someone addressed the problem of not having to remove the chip. I wonder what the timing might be if using a Arduino 256 mega, as that’s what I’m using for development,and you can’t remove it’s chip.
Good post. I am going through some of these issues as well..
Hi, Can anyone advice as it doesnt work for me with aliexpress modules 5v/3v. i did all as noted and it seems not to complete the programming…