
It is step by step guide to make an 3D printer at home using arduino mega. using this home made cheap 3D printer you can make 3D printed object up-to 200mm X 200mm Y 200mm Z
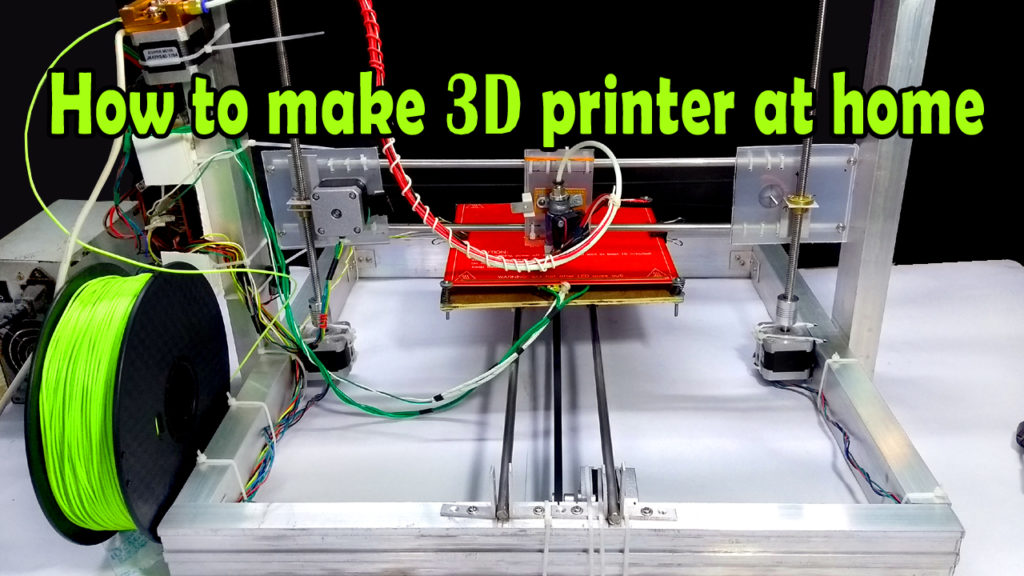
To make the frame of this 3d printer I have used easy available, low cost aluminium channel & did not used any 3D printed parts to make this printer. I tried to use as possible low cost but reliable materials. however I am satisfied with its result so you can make your own diy 3d printer using Arduino.
Generally popular Diy 3d printer using arduino mega is using old DVD drive,s stepper motors but this one is big 3d printer. The small DVD drive stepper motor can print only maximum 4 cm X 4 cm but this big diy 3d printer can print up-to 20 X 20 cm objects.
Here I will going to describe how I prepare the all mechanical part & software details which I have used
Arduino 3d printer kit & other parts from here ( Amazon India)
Parts need to make
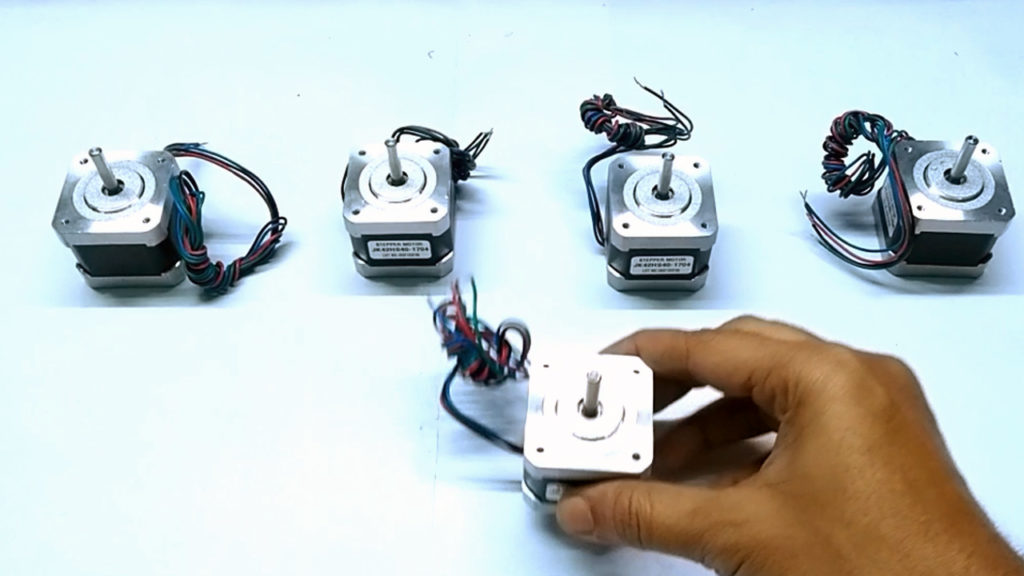
1 . NEMA 17 Stepper Motor 4 Wire Bipolar
Step angle: 1.8 degree
Current: 1 a
Holding torque: 4.2 kgcm
Voltage: 2.4v
No of leads: 4
5 piece
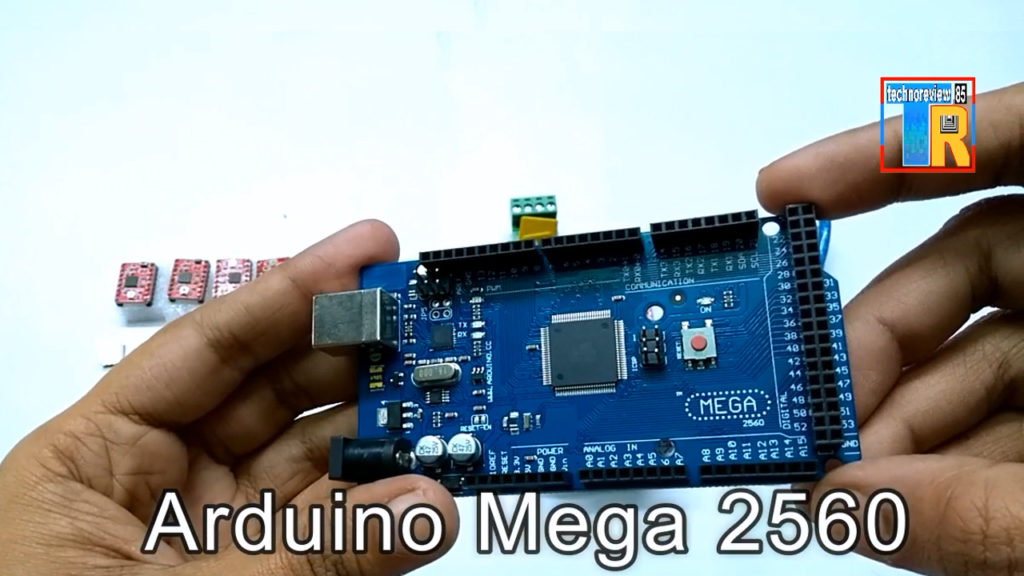
2 . Arduino Mega 2560
3. Ramps1.4 Shield
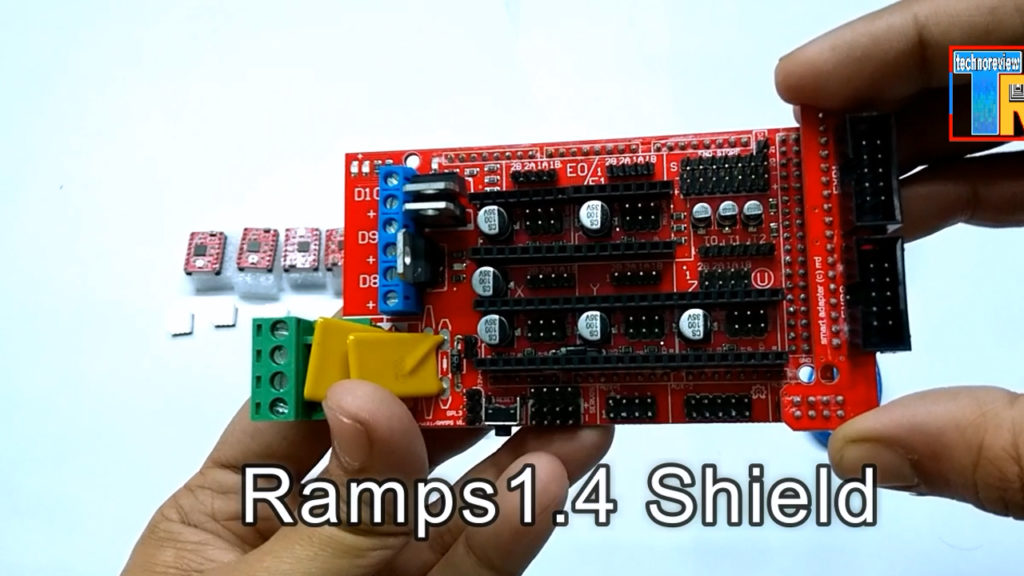
4 A4988 Stepper motor Drivers with heat sink 4 piece
5. V6 J-Head Hotend Bowden Extruder Full Set with Fan
12V Heater, Ptfe Tubing for 0. 4mm 1. 75mm Bowden for 3D Printer
6 .Mk8 Extruder Aluminium Block DIY Kit: Right Hand Type
7. SMOOTH ROD M8 500 MM – 4 pcs
8. T8 Trapezoidal Lead Screw 8MM Thread 8MM Pitch 300MM
9. Flexible Coupling Coupler 5mm8mm25mm (2Pcs)
10. 8 Pieces LM8UU 8 mm Linear Ball Bearing
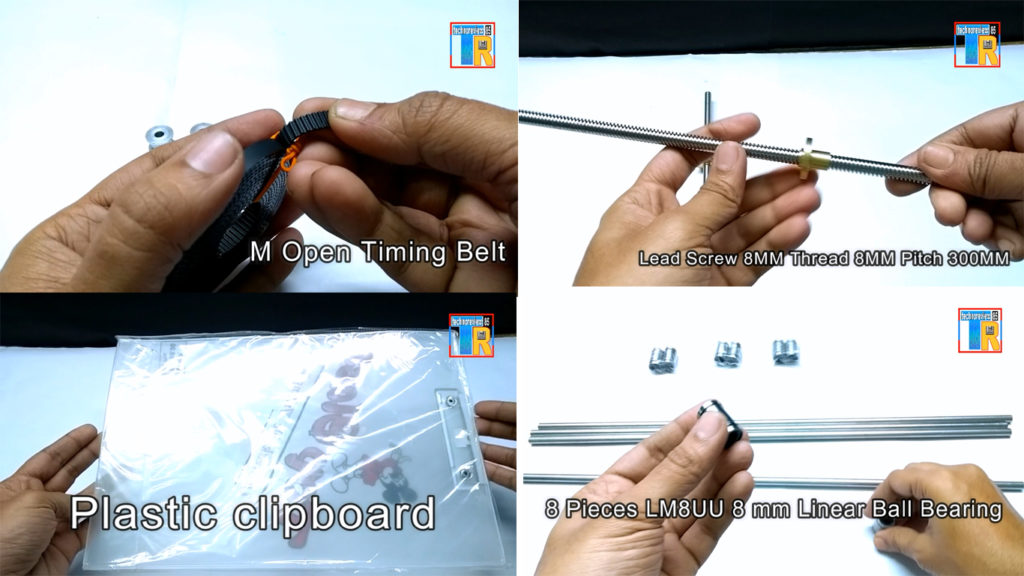
11.2 Meter GT2 6MM Open Timing Belt
12. 2 Pcs 20 Teeth Pulley 5mm Bore
13. PCB Heat Bed MK2B 12/24 Dual Power 214 mm 214mm
14. Radial Ball Bearing 8x22x7mm 608-2RS Ball Bearing – 4 pcs
15. End stop switch – 3 pcs
16. Aluminium channel 2 inch X 1 inch – 12 ft
17. Plastic clip board
18. 20 cm X 20cm glass
19.20cm X 20cm ply wood
20. Screw ,spring ,Zip tie
21. Aluminium L clamp 1″ X 1″
22. 12 Volt 20 amp DC power supply .I am using a modified old pc ATX power supply
23. 1.75 mm filament
Software need
Arduino IDE – Download here
Marlin firmware – Download here
Pronterface software – Download here
Making 3D printer frame using Aluminium channel –
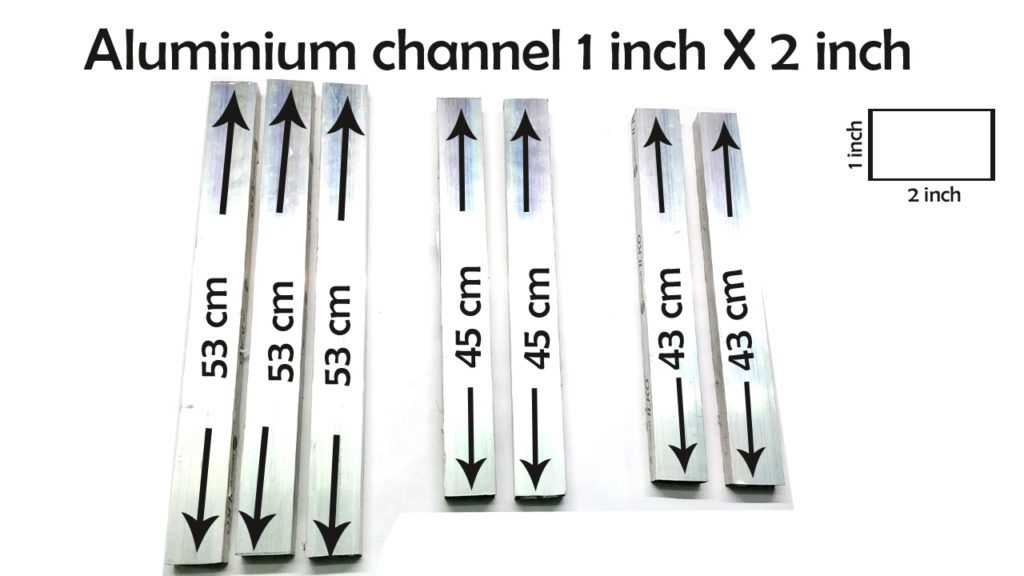
We have to cut aluminium channel using hacksaw
Dimension – 53cm – 3 pcs
45cm – 2 pcs
43 cm – 2 pcs
10cm – 2 pcs ( for bed)
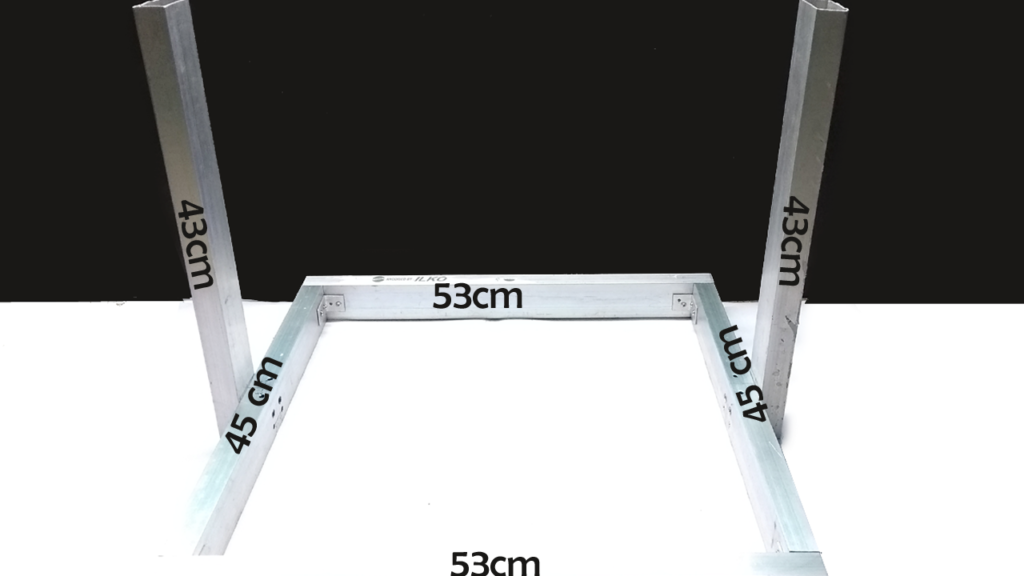
join all aluminium channel using L shaped clamp This video can help you
After making frame we have to install Y axis motor at front side of the printer. I have used zip tie to fix motor.
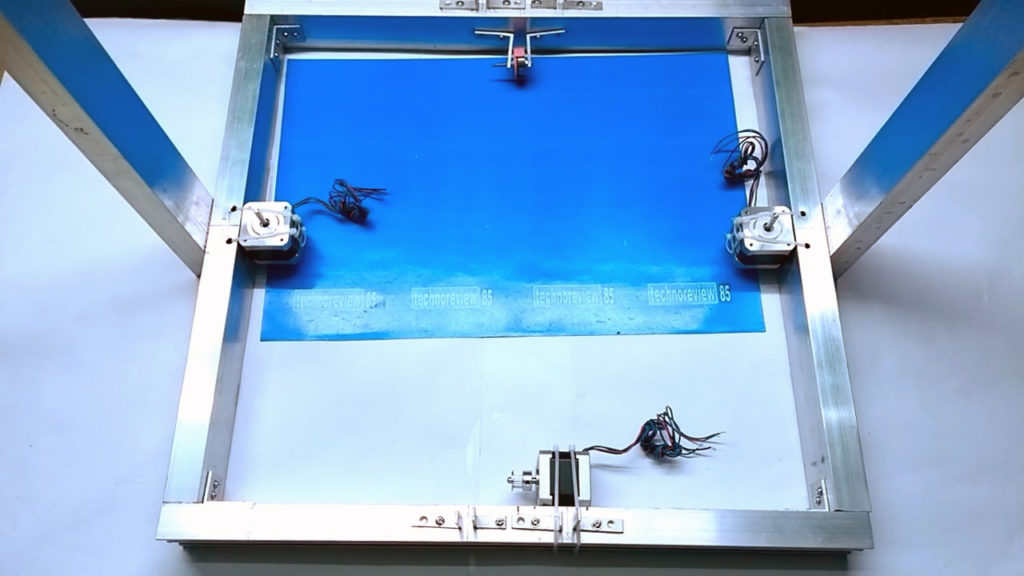
now install 608 bearing using L shaped clamp & install GT2 timing belt to GT2 timing pully
To make a smooth liner motion I have used here 2 pcs 50cm – 8mm – smooth rod & 2pcs 10cm aluminium channel is base of the printer Y axis bed.
For Z axis we have to use two nema 17 motors & two
Trapezoidal Lead Screw connected by
Flexible Coupling .
For making X axis structure I have used cheap plastic clip board you can also use acrylic sheet.
After assembling Y,Z& X axis we have to do assembly
Mk8 Extruder block ( here is MK8 Extruder assembling )
I have used 3 minimum position mechanical end stop switch. you can also use 3 pin end stop.
My end stop switch pin is NC (normally closed ) & NO (normally open) but 3 pin end stop switch connection is may little bit different.
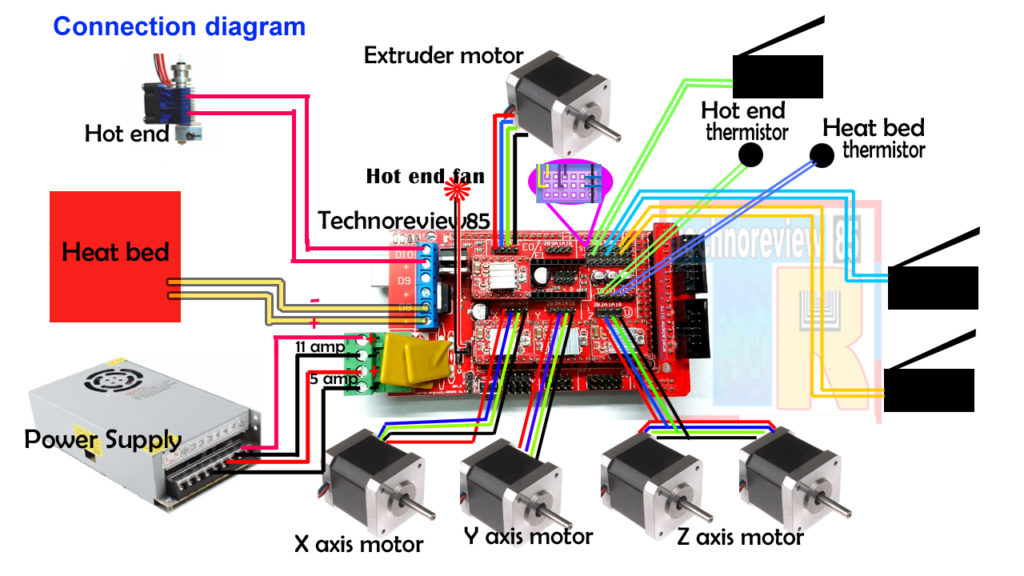
Wiring of 3D printer
We are using 12v 20 amp power supply .please use minimum 1mm wire for connection heat bed & hot end
for temperature sensor & End stop switch you can use thin wire .
place ramps board above arduino mega &
we have to set jumper for micro stepping ( please watch this video ) Then place 4 step stick on ramps board 3 step stick will drive 3 axis (X Y & Z) Motors & other one is for Extruder motor
We are using Ramps 1.4 & A4988 as arduino 3d printer controller
Diy 3d printer software
Check flowing article for Arduino 3d printer code
We are using marlin firmware for this 3D printer. Here is details of marlin configuration.h
please upload software setup
love this project. thanks for your efforts to help people like us. please can you upload the software setup asap. thank you.
okay, I will try to write about it soon. thank you
Programming code arduino please
Can you please give code
Marlin configuration.. set up brother…..other wise…….my… total effort….waste…. brother…please….
Marlin configuration.. set up brother…..other wise…….my… total effort….waste…. brother…please….
Excellent …. information…. brother..but…Marlin configuration…set up upload bro…. otherwise my….total effort …waste….bro….please …. thank you….I hope you….
Plz upload software setup and programing in detail plz
about this, the post is published
link please
Congratulations!!Nice project.
Thanks:)
I am in trouble in midway while making it. Plz help me. Plz.
Finally, an issue that I am passionate about. I have looked for information of this caliber for the last several hours. Your site is greatly appreciated.
I love the information on your website. I totally agree with your post here and I think that you are on the right track.
Can I make the frame smaller, like 400x400x350 mm
I have done all the setup from your YouTube channel in that I am facing a problem while doing test run. In Pronterface it shows *PRINTER HALTED KILL CALL* I don’t know how to sort out this sir. Kindly help me.
Do we really need the 20cm x 20cm glass?
yes…you can’t print direct on heat bed
oh ok
Can you please tell me the types of screws and lengths of them?
Can you please tell me the model number of the NEMA 17 stepper motor?
Can you please tell me the types of screws and lengths of them ?
Is it ok if I use *17HS4401* NEMA 17 stepper motor?
Sir marlin configuration which version to download for performing these changes
Products के price और उनकी वेबसाइट बता दीजिए ।